Begin with a used, 6GB or 8GB AMD RX 580 or NVIDIA GTX 1070 GPU; these cards offer a solid balance of initial cost and ethereum hashrate for a beginner. Your total hardware expenditure for a basic 6-gpu setup should target under £1,500 to maintain a realistic path to profitability. This instructional walkthrough focuses on the physical assembling and initial configuration, providing a comprehensive tutorial for constructing a functioning system.
This diy project requires more than just graphics cards. You will need a motherboard with enough PCIe slots, a reliable power supply unit rated for at least 1200W, a CPU, RAM, and a stable open-air frame. Sourcing these components individually is a core part of the process, demanding research into compatibility and power delivery for a stable mining rig.
After creating the hardware foundation, the software setup begins. You will install a lightweight operating system, like HiveOS or SimpleMining, and configure the mining client. This step-by-step guide will then cover overclocking your gpus to optimise hash rates while managing power draw, a critical step for maximising cryptocurrency yield and operational efficiency.
Choosing Your Mining Hardware
Begin with the GPU; it is the engine of your entire operation. For a new miner constructing a rig today, focus on cards with at least 8GB of VRAM, such as the NVIDIA RTX 3060 Ti or AMD RX 6700 XT. These models offer a solid balance of initial cost and hashrate, which is critical for your setup’s profitability. While Ethereum has moved to Proof-of-Stake, other mineable coins like Ethereum Classic and Ravencoin still demand similar hardware, making this a relevant starting point.
Your hardware configuration extends beyond the graphics card. A common mistake is pairing powerful GPUs with an inadequate power supply. Calculate your rig’s total Thermal Design Power (TDP) and add a 20% overhead; for a six-GPU build, a 1200W-1500W Platinum-rated PSU is non-negotiable. The motherboard is another key component–seek out models specifically designed for mining, with multiple PCIe slots, like the ASUS B250 Mining Expert. This foundational hardware selection dictates the stability and scalability of your entire project.
This initial hardware assembly is only half the battle. True optimisation happens in the software, through meticulous overclocking. Using tools like MSI Afterburner, you will undervolt the core clock and increase the memory clock to maximise hashrate while reducing power draw. For an RTX 3070, a stable configuration might be a -502 core clock, +1200 memory clock, and a 60% power limit. This fine-tuning is what transforms a standard DIY build into a profitable operation, turning your instructional guide into a practical, data-driven walkthrough for creating a functional cryptocurrency miner.
Assembling Your Mining Rig: A Hardware Configuration Walkthrough
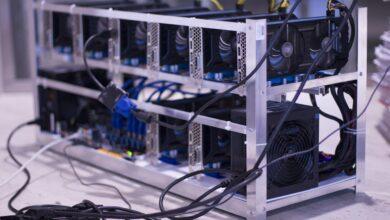
Mount your GPUs onto the open-frame rig first, ensuring each card is securely fastened with zip ties or the provided brackets. A six-GPU configuration, common for an Ethereum miner, requires a stable frame to prevent stress on the PCI-e risers. Connect each GPU to a riser card, then plug the riser into a motherboard PCI-e slot. Power the riser using a 6-pin PCI-e cable from your PSU, never the SATA connectors, as they are a fire risk under constant load.
Your initial hardware setup must focus on clean power delivery. A 1200W 80+ Gold PSU can typically support three mid-range GPUs; for a six-card rig, use two such PSUs linked with a dual-PSU adapter cable. Employ a server PSU with a breakout board for superior efficiency in larger setups. Use 16-gauge wiring for all power connections and ensure no cables are daisy-chained to a single PSU port, distributing the load evenly across the available rails.
After the physical constructing is complete, the software configuration begins. Flash the motherboard BIOS to the latest version, enabling ‘Above 4G Decoding’ and setting the PCI-e slots to Gen1 or Gen2. This prevents detection issues with multiple GPUs. Install a dedicated mining OS like HiveOS or a simple Windows 10 build. In the driver settings, disable all power-saving features and set the system to power on automatically after an AC loss.
The final step before mining is GPU overclocking. This directly dictates your rig’s profitability. For an Ethereum setup, begin with a conservative configuration: reduce the core clock by 200 MHz, set the memory clock between +800 and +1200 MHz, and limit the power limit to 70-80%. A typical RTX 3070 should draw around 120-130W while maintaining a hashrate of roughly 60 MH/s. Use a tool like MSI Afterburner or the built-in tools in your mining OS to apply these settings, testing for stability over a 24-hour period.
Installing Mining Software
Download your mining software before you power on the rig. For a beginner, I recommend starting with HiveOS for your initial setup. It’s a Linux-based operating system that runs from a USB stick, bypassing Windows driver issues entirely. This approach turns your DIY project into a plug-and-play system, a stark contrast to the fiddly nature of assembling the physical components.
Your configuration hinges on the cryptocurrency you choose. For Ethereum mining, you’ll need both a miner like TeamRedMiner (for AMD GPUs) or T-Rex (for Nvidia) and a wallet address. In HiveOS, you add your ‘flight sheet’ – this is where you input the pool’s address (e.g., ethermine.org), your wallet, and select the mining software. This step-by-step walkthrough within the OS is far more manageable than editing complex .bat files in Windows.
Fine-Tuning for Maximum Hashrate
Post-installation, the real work begins. Do not run your rig on stock settings. Immediate overclocking is non-negotiable for profitability. For an Nvidia RTX 3070, aim for a core clock delta of -502, a memory clock delta of +1200, and a power limit of 115W. This configuration should yield around 62 MH/s while consuming significantly less electricity than the default 220W. This precise hardware control is the final step in creating a truly efficient operation.
Treat this software setup as an ongoing diagnostic tool. Your miner’s output log is a live data feed. Monitor it for hardware errors, stale shares, and invalid shares. A high number of errors means your overclocking is too aggressive; dial back the memory clock. This continuous feedback loop transforms a static assembling project into a dynamic, data-driven system, which is the core of sustainable cryptocurrency mining.